

Post by biNg on May 20, 2018 7:43:22 GMT -8
Hi all,
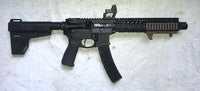
I wanted to make a post regarding the little round known as the 22 TCM, and the current build I am in the process of completing. I felt that the information I have would benefit others that may be thinking of this round in an AR platform. For those who don't know what the TCM is, here is a link for a brief description on it: en.wikipedia.org/wiki/.22_TCM. The information presented will be very basic and to the point so as not to detract from the important aspects of each step. Also, I will more then likely forget to include some information, so fell free to ask questions. And there will probably be grammatical errors, sorry about that. Picture of the gun at the bottom. Also, a big thanks to GLSHOOTER (Greg), he was a big help as usual.
First and foremost, one might think, "why would you want this round in an AR when there are so many more options out there that are better suited"? And my answer to that question would be, "It's unique, and an additional pistol caliber option in the AR platform, which has become more and more popular as of late. I.E. 9MM, 45 ACP, and 10MM to name a few". The first major limitation that is immediately apparent is found in the feeding and function from a magazine. Some have been successful in modifying a standard AR mag to accommodate the short stubby round, which is accomplished through the modification of the follower, and a custom made feed ramp installed, while others have used magwell inserts (much like 9mm options), to use PPS-43 or 30 Carbine magazines. Both seem to work fine, but often times need to be tweaked just a bit for reliable feeding and function (nose up jams between the locking lugs and chambers are a pain). I chose to go the PPS-43 magazine route, which was for a purpose built 80% 9mm slim lower. This is direct impingement build, not a blowback.
Just as guidance for my article, here is the order of the items I’ll be talking about: barrel, lower, magazine, upper, and testing.
To spare all of the gory details on this build process, which has taken months, I’ll give you the synopsis of what I had to do to make this work. First and foremost, I needed a barrel, which I got through blackholeweaponry (love their stuff). Since this is not a widely accepted round, I had to send them the reamer in order to have the barrel made. The reamer was a rental from 4drentals.com. After all the details were worked out with BHW (cs was excellent through this whole process, thank you Lisa!), the wait began. Although, the wait was to be expected, I had plenty to do in preparation to complete the build once my barrel arrived.
Next step was procuring a lower, which I purchased through thebuffalo.com. I went with the 80% 9mm slim lower because it’s dimensions allowed the acceptance of the PPS-43 magazine without too much gap, but required some milling of the magwell. Long story short, I used a center cut endmill bit on a drill press to remove the bulk, then fine tuned it with hand files. In short, this took a tremendous amount of time, but was well worth the effort. Going this route gave the finished product a more “intentional” look in the end, one that made it look as if the lower was designed for the magazine, rather then having a retro-fit look (look up 9mm magwell inserts, you’ll see what I’m talking about). Although, one sacrifice that will be made is the bolt hold open feature, I haven’t devised a way to make it work yet, future plans.
The final step was also apart of the second step, which was the modification of the PPS-43 magazine. These mags are curved, and have a rib going down the back, which posed challenges due to it’s design. As we know, the magwells in ARs are straight, which aren’t conducive to magazines that start their curve pretty much from the front of the feed lips. This required me to file out the front of the magwell in a sloping manner to accommodate the curve. The rib in the back had to be filed in a 90 degree angle from the back of the feed lips. I accomplished this by placing a square on top of the feed lips, flushed up with the back of the mag, then striked a line down the rib on the back side so I knew how much material to take off, and where. The last step of the magazine fitment was cutting a slot for the mag catch, which actually had to wait till I could build my upper so I could set the proper depth of the magazine in relation to the bcg for clearance. More on that in the next step.
Once I received my barrel, the building of the upper could commence, which is straight forward for anybody who has built an AR before. I used an Aero Precision complete upper receiver, Raptor charging handle, Faxon LW BCG, SLR adjustable gas block, Daniel Defense RIS II (MK18 clone) hand guard, KAK micro slim flash can, Magpul accessories for the hand guard, Scalarworks RMR leap mount, and an RMR with 3.5 moa dot. The details of the barrel consist of a pistol length gas system, 9.5” light profile, 0.078” gas port hole (which I had to open up to 0.086” for proper function with this round), and 1/2x28 muzzle threading. Once the upper was complete, I was able to set the depth of magazine in regard to the BCG and the feed lips, and cut the mag catch hole. But before I could do that, I had to get the feed ramp to clear the bcg. A feed ramp is necessary with this build because of the gap that is between the front of the magazine and the chamber, this helps guide the short round to the chamber. I accomplished this by installing the feed ramp, putting gun together, manually moving bcg forward till contact was made marking, mark where to file, then slowly removed material on the feed ramp till it cleared without rubbing. After this I was able to start on the fitting of magazines, which was accomplished by placing electrical tape over the approximate area, inserting mag till it just cleared the bcg, heating up mag catch where it would insert in mag, place mag catch in place to melt the tape and give me an exact location of the hole to be drilled, trace lines onto mag so tape can be removed, followed by filling for a perfect match. And for anybody who have dealt with the PPS-43 magazines will know that not all are the same dimensionally, so hand fitting and tweaking the feed lips on every one was necessary.
Testing consisted a milspec full auto bcg (for weight), standard carbine buffer system, and a Timney 3.5 lbs trigger. I also opened up the gas block all of the way to ensure I had all the gas I could get in the beginning while I was testing for proper function. When the build is complete, I’ll be using a lightweight bcg and a jp silent capture buffer system for full tuning. All testing has been done with factory ammo, I would like the option to use it (both standard 22 tcm and 9r variants). My first range trip I left the gas port at 0.078”, to which the gun would not cycle fully. It would eject the casing, but would not pick up the next round. My second range trip consisted of testing with different bcgs and buffer systems to rule out all possible mechanical issues, to which no effect was noticed. The third range trip had the gas port opened up to 0.0820”, and had the standard bcg and carbine buffer system installed (I want it to run with standard parts so that anything else I do do to tune it will just be preference, not a necessity). This session was a success in function and ejection, but would not operate with 9r ammo 100% of the time (standard tcm did). For my fourth and final range “function test”, I opened up the gas port to 0.860”, to which I experience 100% success with both types of ammo.
With all of that out of the way, I am now able to work on reliable function, which the gun does not currently have. The most common malfunction is the “nose up” jam (as described above). I believe the culprit is the location of where the round is contacting the feed ramp, which I was able to see in slow motion footage I took of the action working. The issue here isn’t so much the angle, but where the casing contacts the ramp. Currently, the “nose up” jam is caused by the neck of the round hitting the front of the ramp, inducing a millisecond bind, followed by being launched at an extreme angle into the bind. I don’t want to mess with the angle of the feed ramp anymore then I have to, so I am going to gradually slope the front of the feed ramp till the binding goes away. If the jam is still occurring after this, I may have to set the magazine higher so that the round is more inline with the chamber, which will require the milling of the bottom of the bcg to allow the feed lips to clear when sitting higher in the magwell.
In conclusion, the gun is a hoot to shoot (soft as a 22LR), but the verdict is still out on this build. I know it will be worth it, but there are definitely easier routes to go, which I would recommend for anybody looking for a conversion. If you are, check out these two guys, they have inserts for the 7.62x25 Tok (which is dimensionally similar to the TCM, and what most guys use to shoot this round in their AR’s): www.rmwxtreme.com, thearguy.com/products-page/magazine-adapters/mag-adapter-pps-43-standard-right. These options are closer to being turn-key.


 ? Hold on, let me catch my breath, "one thing at a time Chris"! I believe my wife is going to have to sell off some shoes so I can make room for more pew pewters
 . Is there ever enough time for these projects? I think we all know the answer to that. Now, off to have some fun!
 . As far as carbine lowers, unless you have a specific one in mind, you could utilize the Quarter Circle 10 Glock large frame lower with Glock 20 magazines and go to town. There would probably need need to be some tweaking of the feeds lips for proper feeding. The only thing you'd need to have done is the milling of the BCG to accommodate the feed lips of the magazine. Unless you can machine things yourself, I'd highly recommend Ronald Williams at rmwxtreme.com, he does great work. I have a 9mm DI upper from him and it is spot on.

